

Next: 5. Calibration and Accuracy
Up: ISOLWS DATA USERS MANUAL
Previous: 3. Instrument and AOT
Subsections
4. Instrument Characteristics
4.1 Introduction
In this chapter we give some information on the instrument specific
characteristics that have influence on the data. These characteristics
will be described with calibration parameters that are determined in
the Performance Verification phase. Most of these parameters have also
been determined in the laboratory during ground based tests.
4.2 Behavior of the Detector Circuit
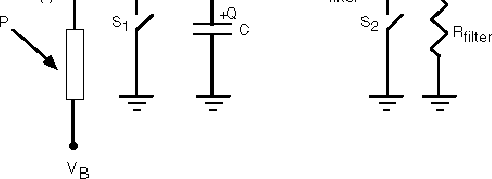
Figure 4.1:
Schematic diagram of the
integrating amplifier circuit used in the LWS detectors.
 |
The LWS uses photoconductive detectors in which the radiative input power P
is converted into a photocurrent I. The detectors are used in an integrating
amplifier circuit, shown schematically in figure 4.1,
whereby the photocurrent
is integrated on the gate of an FET. The output voltage
Vout(t) of the FET
is read non-destructively at a frequency of 88 Hz and the amplifier is
periodically re-set by shorting the gate to earth via switch S1. It is clear
from the diagram that, as the voltage on the gate of the
FET charges, the effective bias Vin(t) changes across the detector,
introducing a non-linearity into the response. The original way this was handled
is described in appendix A. Because of the weaknesses of
this original method, this theoretical approach is no longer used from
version 7 of the OLP pipeline. Currently the photocurrents are extracted using
the '
 method. This method is described in
section 6.3.6. This new method is calibrated empirically
against signals of known strength.
4.3 Grating Characteristics
The grating characteristics are:
- Grating rest position.
- This is the position of the grating mechanism
when no power is applied to the drive coils. The grating is returned to
this position at the end of each measurement with the grating in order
to minimize the popwer input to the ISO cryostat.
- Grating scan range
- The set of positions over which the Grating may be
moved is limited by the design of the mechanism (the range of the
mounting pivot movement). The Grating Scan range defines this set
of positions to be those for which the drive current is less than
12 mA.
- Grating spectral element
- This is the Full Width Half Maximum of the of
the instrument spectral response, in the Grating Mode, to an unresolved
spectral line. It determines the resolving power of the instrument in
medium resolution observations.
4.4 Fabry-Perot Characteristics
- Fabry-Perot Optimum Offsets
- The Fabry-Perots have one fixed and one
moving etalon. The movement of the moving etalon is controlled by three
coils each driven by a servo-loop. In order to operate correctly the
moving etalon has to be parallel to the fixed one to a very high degree of
accuracy - this is achieved by applying a fixed offset to the control signals
for two of the coils. These fixed offsets have been optimised during
Performance Verification. The offsets are constant over the scan range
for FPS, however, for FPL (owing to a fault in the wiring harness) they
are constantly altered over the scan range to keep the etalons parallel.
- Fabry-Perot Spectral Element Size
- This is taken as the full width at
half maximum of the Airy profile it varies with wavelength over the band
of each Fabry-Perot but the resolving power, defined as
 ,
is more or less constant.
- Fabry-Perot Miniscans
- For extended range wavelength scans on the
Fabry-Perots (AOT L03), a small range is scanned at each grating setting,
these are termed miniscans. The range over which the Fabry-Perot is scanned
for each miniscan is limited to keep the spectrum at the peak of the grating
resolution element response.
- Fabry-Perot Scan Range
- The range over which the Fabry-Perot is scanned
for L04 is expressed in numbers of resolution elements - the maximum range
is 15 resolution elements.


Next: 5. Calibration and Accuracy
Up: ISOLWS DATA USERS MANUAL
Previous: 3. Instrument and AOT
ISOLWS Data Users Manual, Issue 5.0, SAI/95-219/Dc

![]() method. This method is described in
section 6.3.6. This new method is calibrated empirically
against signals of known strength.
method. This method is described in
section 6.3.6. This new method is calibrated empirically
against signals of known strength.