

Next: 5.4 Calibration sources and
Up: 5 Calibration and Accuracy
Previous: 5.2 Instrument characterisation procedure
- Grating mode calibration
-
This is done using first a full grating scan on a source with known lines
to identify the lines suitable for wavelength calibration, those that are
strong enough to give good signal-to-noise and that are narrow enough
to determine an accurate line centre. Individual scans of these lines
are then made to provide accurate line positions. These line positions
are fitted to the known wavelengths with a third order polynomial to
give a grating calibration that is adequate for the low resolution mode
of the instrument.
- Spectral element
-
The size of the grating spectral element is determined using the
mixed mode observations. Detailed FP scans are made with the grating
at a fixed position, giving a very detailed profile of the grating
response function: from this, the size of the spectral element
(Full Width Half Maximum) is determined. The observation is done
for several detectors and grating positions to get the wavelength
dependence of the profile and spectral element.
- Wavelength Calibration
-
The wavelength calibration of the Fabry-Perots is carried out by observing
strong, narrow lines with known wavelengths. The centres of these
lines are determined as a function of the commanded position of the
Fabry-Perot. The corresponding order of interference and etalon gap are
calculated abd the gap is fitted as a third order polynomial in
commanded position.
- Spectral element
-
The size of the Fabry-Perot spectral element is determined using the
wavelength calibration observations. The Fabry-Perots are scanned over
lines known to be narrow, on sources with a reasonably well known
velocity dispersion. The Fabry-Perot profile is determined by deconvolving
the observed lines shape with the expected line shape given the source
structure and velocity dispersion. From this
the size of the spectral element (Full Width Half Maximum) is
determined. The observation is done for several lines to get the wavelength
dependence of the profile and spectral element. Note that at this moment
this calibration has not been done, due to the lack of suitable sources
for this calibration. It is expected that the calibration source G0.6-0.6
can be used for this purpose.
The absolute flux calibration is done by
directly comparing the detector photo current of a standard source
with the known (model) flux (corrected for the optical characteristics of the
telescope and the LWS instrument).
The LWS has been calibrated by observing Uranus, a source for which a good
model exists and which is point-like in the LWS beam. At each wavelength
the expected flux density (power per unit area) from Uranus, within the
spectral resolution element, is calculated from the model and the
corresponding photocurrent is measured. This calibration therefore
provides a direct relationship - for a point source - between the
photocurrent and the flux density at the entrance pupil of the ISO
telescope. This relationship is then used to assign a flux density to
the observed photocurrent from any other source.
The observations for the flux calibration are repeated for several
bias levels.
The grating relative response needs to be known before the FP relative
response calibration and the FP transmission calibration can be performed.
For the photometric calibration and the relative response calibration
several sources were used during PV phase and during the routine
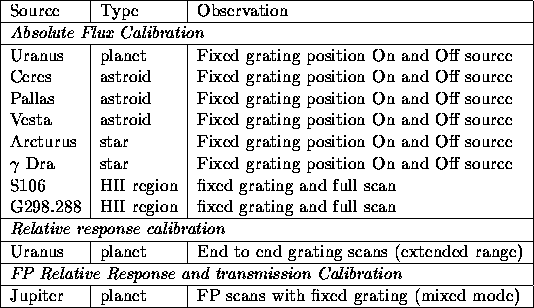
calibration observations. Table 5.1 gives the sources
for the different calibrations.

Table 5.1: Sources used for
the photometric calibration and the relative response calibration
of the LWS grating and Fabry Perot subsystems. The primary source for
the grating flux calibration is Uranus, the other sources are observed
regularly for checking purposes.
For the Fabry Perot response the FP is scanned with a high oversampling
with the grating at a fixed position (mixed mode observations). Again here
the source spectrum is
removed (by means of a model or a grating scan). Finally the profile
is normalized to the absolute transmission at a given wavelength (the
FP transmission is determined in a separate procedure, see below).
The FP transmission is determined by using scans of strong lines with
both the grating and the Fabry Perot. Comparing the output of the
detectors for these scans of the same line for grating and Fabry Perot
gives the the Fabry Perot transmission at the wavelengths of the lines.


Next: 5.4 Calibration sources and
Up: 5 Calibration and Accuracy
Previous: 5.2 Instrument characterisation procedure
N.Trams, ISO Science Operations Team
Using inputs from:
C.Gry, T. Lim, LWS Instrument Dedicated Team
A.Harwood, P.E.Clegg, B.Swinyard, K.King, LWS Instrument Team
S.Lord, S.Unger, IPAC.
